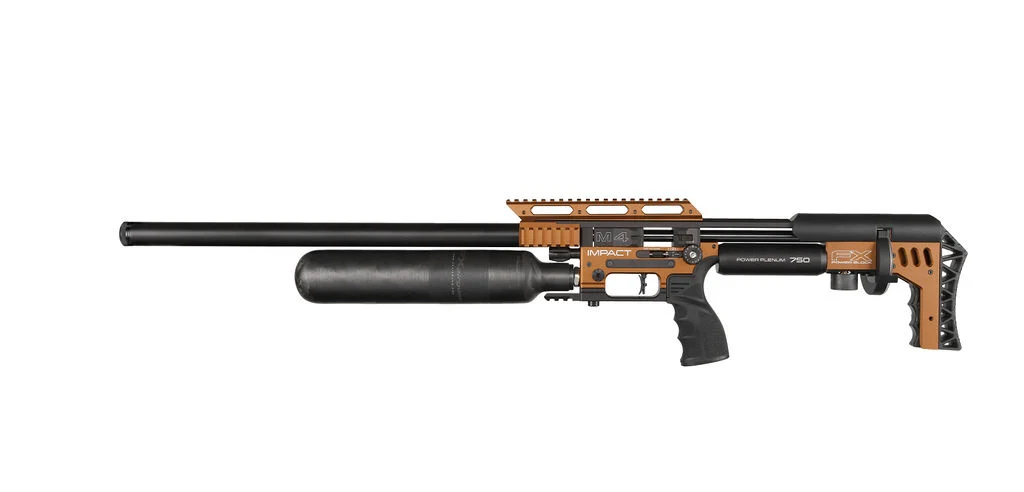
FX Impact M4 Tuning Guide: Maximizing Accuracy with Canadian-Available Accessories
What “accuracy tuning” really means on the FX Impact M4
The FX Impact M4 is one of the most tunable PCP platforms available, which is both the reason it can shoot unbelievably well and the reason many owners get lost in adjustments. When people say “impact m4 accuracy,” they’re usually talking about one (or more) of these outcomes:
- Smaller groups at a known distance (bench-rest style precision)
- Lower velocity spread (more consistent point of impact as ranges stretch)
- Better pellet/slug compatibility (a tune that stabilizes your chosen ammo)
- More forgiving behavior across temperatures, fill pressures, and shooting pace
A practical way to think about FX airgun tuning is: you’re trying to make the rifle deliver the same push behind each shot, launch the projectile cleanly into the rifling, and keep the barrel system behaving the same from shot to shot. The Impact M4 gives you multiple “levers” to do this—regulator pressure, hammer energy, valve dwell, and barrel system variables.
This guide focuses on accuracy-first tuning steps and fx impact accessories that can help—specifically items readily available to Canadian shooters through curated collections and product pages (linked throughout). It’s written as a pcp tuning guide, not a power-chasing checklist.
Start with a baseline: clean setup, known ammo, and a stable test method
Before changing parts, build a baseline that actually tells you something. The Impact M4’s adjustability can mask problems (or create them) if your testing method isn’t consistent.
1) Pick one projectile and stick with it during tuning
Choose a pellet or slug you can get consistently and use one lot number if possible. Switching ammo mid-tune makes it impossible to know what changed. If you plan to shoot slugs long-term, tune for slugs from the start; if you plan to shoot pellets, tune for pellets first.
If you’re still deciding, it helps to understand that pellets often tolerate a wider range of tune settings, while slugs usually demand tighter velocity windows and more attention to barrel harmonics.
2) Confirm the rifle is mechanically “sound”
Accuracy tuning can’t compensate for air leaks, damaged seals, or inconsistent regulators. A small leak can cause your regulator to behave oddly, your velocity to wander, and your groups to open up. A simple preventative step is keeping seals on hand. An O-Ring Replacement Kit for FX Impact M3/M4 is a practical addition for any Impact owner, especially if you do frequent adjustments.
3) Use a chrono and record your data
Whether you’re tuning pellets at 50 yards or slugs at 100+, a chronograph is one of the quickest ways to identify what the rifle is doing. Record:
- Regulator pressure
- Hammer setting(s)
- Average velocity
- Extreme spread (ES) and standard deviation (SD) if available
- Group size and conditions (wind, temp, distance)
You’ll quickly see patterns—especially when your accuracy improves only when the velocity spread tightens.
How the Impact M4 makes a shot: regulator, hammer, valve, barrel
To tune effectively, it helps to know what each major system controls.
- FX impact regulator: sets the pressure feeding the firing valve. This is the “available energy” per shot.
- Hammer and hammer spring: controls how hard the valve is struck, affecting valve opening time (dwell) and how much regulated air is released.
- Transfer port / power system: shapes airflow and can limit or optimize efficiency for a chosen projectile weight/style.
- Barrel system (liner, sleeve, tension, and tuner): governs how consistently the projectile engages rifling and how the barrel vibrates (harmonics) shot to shot.
Accuracy is usually best when these systems are balanced—enough air and valve dwell to reach a stable velocity node for your ammo, without harsh or inconsistent barrel behavior.
Step-by-step tuning process for accuracy
This is a practical order of operations that reduces guesswork. The core idea: stabilize pressure and velocity first, then refine the barrel system.
Step 1: Set (and verify) your regulator pressure
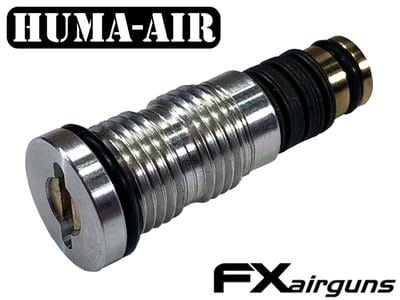
The regulator is the foundation. If your reg output is inconsistent, everything downstream becomes inconsistent. On many builds, especially when chasing long-range consistency, an aftermarket regulator can be a worthwhile upgrade—primarily for stability and repeatability rather than “more power.”
One commonly used option is the Huma FX Impact Tuning Regulator Gen 3. Whether you run stock or aftermarket, the same principles apply:
- Change one thing at a time, and allow the regulator to settle.
- Work in small increments. Large jumps make it harder to find a stable node.
- Watch for reg creep (pressure rising after sitting). Creep can show up as a “first shot high” pattern.
Practical accuracy tip: many shooters find their best groups not at the highest regulator setting, but at a pressure where velocity is stable and the barrel is “calm.” If your ES is large, don’t immediately blame the barrel—verify the reg and hammer balance first.
Step 2: Balance hammer energy to the regulator (don’t overdrive)
Once the regulator is set, tune hammer energy until you reach the velocity window you want with your chosen ammo. Overdriving (too much hammer for the reg pressure) can cause:
- More air use with no meaningful accuracy gain
- Valve bounce or inconsistent dwell
- Harsh firing cycle that can worsen harmonics
One very effective way to refine the hammer/valve relationship is to change hammer mass rather than relying only on spring tension. A FX Impact Tungsten Hammer Weight increases hammer mass so you can often achieve the same (or better) performance with less spring tension. This can improve consistency and reduce “spiky” behavior in some setups, especially higher power builds.
How to use it as an accuracy tool: aim for a tune where small hammer adjustments produce predictable velocity changes, and where your ES tightens across a string. Many accuracy-focused tunes show their best groups in a velocity node where the point of impact is least sensitive to small speed changes.
Step 3: Consider airflow and the slug/pellet power system
If you’re shooting slugs or heavier projectiles, you may hit a point where the rifle is asking for more stable airflow than a standard configuration provides. The goal isn’t simply “more power,” but controlled power with repeatable velocities.
The FX Impact Slug Power Kit is designed to support slug-oriented builds. In an accuracy context, it can help you reach a stable velocity range for slugs without pushing hammer settings into less consistent territory.
Important: if you install power-oriented parts, re-check everything—reg pressure, hammer settings, and your barrel tune. Accuracy is about balance, and changing airflow can shift the best node.
Step 4: Get the barrel system right (liner, sleeve, tension, tuner)
The Impact platform’s barrel system is where many accuracy gains live—especially once your velocity is consistent. Canadian shooters often start here because it’s tangible: liners, tensioners, sleeves, and tuners are measurable changes.
Liners and barrels: matching the projectile to the rifling
The Impact M4’s modular barrel system allows you to change liners for different calibers and ammo styles. If you’re troubleshooting accuracy, don’t overlook the possibility that your current liner simply doesn’t love your chosen projectile.
Options like FX STX Superior Liners give you a route to optimize for pellets or slugs depending on the liner type and twist rate. Explore compatible liner options through FX Barrel Kits & Liners.
What to look for when evaluating a liner:
- Does it stabilize the projectile at your intended velocity?
- Do groups tighten when you slightly adjust velocity up/down?
- Are you seeing unexplained flyers that disappear with a different ammo shape or size?
For many shooters, the “aha” moment is realizing that a modest velocity change plus the right liner can outperform a high-power tune with the wrong barrel dynamics.
Barrel tension: controlling barrel behavior shot to shot
Barrel tensioning is one of the most impactful (and misunderstood) tools for improving impact m4 accuracy. The idea is simple: by applying consistent tension to the barrel/liner assembly, you can change how the barrel vibrates and how it returns to the same position after each shot.
A dedicated solution is the FX Impact Barrel Tensioner Kit (example shown for 700mm). Tensioners can help:
- Reduce vertical stringing
- Improve consistency as the barrel warms slightly during shooting
- Make a tune more forgiving across small velocity changes
How to approach barrel tensioning: treat it like a tuning knob, not an on/off upgrade. Make small adjustments, then shoot groups. Record each setting. Many shooters find that accuracy improves in a few “sweet spots,” with worse groups between those points.
Common mistake: adding too much tension too quickly. Over-tensioning can create new harmonics that show up as random flyers.
Barrel tuners: finding a harmonic node without chasing velocity
Once your velocity and barrel tension are in a good place, a tuner can be the final refinement. A barrel tuner adjusts the effective harmonic behavior of the barrel system, letting you “move” the barrel’s sweet spot to match the timing of the shot.
The FX Integrated Barrel Tuner is a popular approach because it’s designed to work with the FX barrel ecosystem. A good tuning workflow is:
- Lock in your regulator and hammer tune (stable velocity, reasonable ES).
- Confirm your best ammo choice for the session.
- Adjust the tuner in small increments and shoot groups at a fixed distance.
- Stop when you find a repeatable node, then confirm at longer range.
Practical note: tuners are not a substitute for a stable tune. If your ES is large or you have reg creep, a tuner may appear to “help” on one group and disappoint on the next.
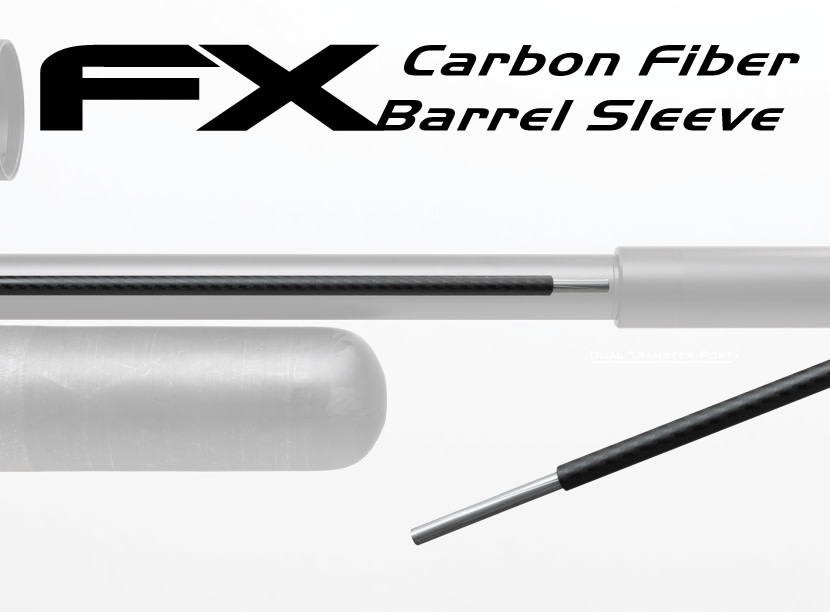
Barrel sleeves: stiffness, protection, and consistency
Another way to influence barrel behavior is by changing the stiffness and damping of the barrel system. FX Carbon Fiber Barrel Sleeves can add rigidity and help protect the liner/sleeve assembly. Depending on your configuration, a sleeve can:
- Improve consistency by reducing unwanted flex
- Change resonance characteristics (sometimes for the better, sometimes requiring re-tuning)
- Offer a practical durability benefit for field use
If you add or change a sleeve, re-check your best tuner/tension node. Barrel components interact; changing one often shifts the best setting of the others.
Putting it together: two example tuning paths (pellets vs slugs)
Below are two common “roads” Impact owners take. These aren’t universal settings—every rifle, liner, and ammo combination is different—but the order of operations stays consistent.
Path A: Pellet accuracy build (simplicity and forgiveness)
- Pick a pellet known for consistency in your caliber and availability.
- Set regulator to a moderate, stable pressure and confirm it settles.
- Adjust hammer for a velocity range that groups well (don’t assume faster is better).
- Confirm ES/SD across a meaningful string (not just 5 shots).
- Refine barrel system (tensioner, then tuner) to eliminate stringing and tighten groups.
Pellet accuracy often comes from a calm firing cycle and a stable velocity node. You may not need power kits or heavy hammer changes unless you have a specific reason.
Path B: Slug accuracy build (stability and barrel control)
- Choose a slug and commit to it for the tune.
- Verify liner suitability and consider a liner optimized for slugs if needed.
- Set regulator to support the velocity window the slug prefers.
- Balance hammer energy; consider a tungsten hammer weight for smoother, repeatable valve behavior.
- Evaluate airflow; if the rifle seems “choked” or inconsistent at the required output, consider the Slug Power Kit and re-tune from the regulator forward.
- Use barrel tension and a tuner to find a harmonic node that stays stable across longer strings.
Slugs tend to reward careful tuning and disciplined testing. Once dialed, they can be extremely consistent at longer ranges, but they usually expose weaknesses in regulator stability and barrel setup faster than pellets.
Troubleshooting: what your groups are telling you
When you see a pattern on paper, you can often identify the most likely cause and the next best adjustment. Here are common symptoms and what to check first.
Vertical stringing
- First check: velocity spread (chrono). If ES is high, address regulator/hammer balance.
- Next: barrel tension settings. A barrel tensioner is often the fastest way to reduce vertical movement once velocity is stable.
- Also consider: inconsistent hold, bipod bounce, or bag technique—especially on lightweight rests.
Random flyers (one shot out of an otherwise good group)
- First check: ammo (damage, inconsistent seating, debris).
- Next: liner cleanliness and crown condition (avoid aggressive cleaning that can harm the crown).
- Also consider: a tuner node that is close but not stable—small tuner adjustments can turn “almost” into “repeatable.”
Two distinct group clusters (double-grouping)
- First check: loose optics mounts or shifting accessories.
- Next: barrel system components not fully settled (sleeve, tensioner, or tuner movement).
- Also consider: regulator behavior across the fill (some setups show better stability in a specific pressure band).
Great 5-shot groups, inconsistent 20-shot groups
- First check: regulator stability and air management. Longer strings reveal inconsistency.
- Next: barrel heat/settling effects; tensioning can help maintain consistency.
- Also consider: shooter fatigue and changing wind conditions—log conditions carefully.
Essential accessories that support accurate tuning (not just “upgrades”)
Not every accessory is about adding performance. Some reduce downtime, prevent mistakes, or make your settings repeatable—key goals in any fx airgun tuning routine.
- Seals and maintenance: O-ring kit for routine servicing after adjustments.
- Barrel system options: explore Barrel Kits & Liners when ammo changes demand different stabilization.
- Regulators and consistency parts: browse Regulators if you’re addressing creep or inconsistency.
- FX custom and tuning ecosystem: FX Custom Parts & Tuning for platform-specific tuning components.
If you’re building an “accuracy kit” around the M4, it’s helpful to focus on parts that increase repeatability: stable regulation, predictable hammer behavior, and controllable barrel harmonics.
Canada-specific considerations: legality, support, and parts availability
For fx impact canada owners, the tuning conversation often includes practical factors beyond pure performance:
- Configuration and compliance: ensure your setup aligns with applicable Canadian rules and how your airgun is classified. When in doubt, confirm before making major power changes.
- Parts sourcing: it’s easier to tune when you can get the exact liner, regulator parts, or Impact-specific accessories you need without long delays.
- Seasonal conditions: Canadian temperature swings can change air density and lubricant behavior. Stability-focused tuning (moderate pressures, calm firing cycle) can be more forgiving across seasons.
A practical tuning checklist (printable mindset)
When you’re deep into adjustments, it’s easy to lose track. This simple checklist keeps your work systematic.
- Pick one ammo and one distance for the tuning session.
- Verify seals and address leaks before chasing settings.
- Set regulator and allow it to settle; confirm behavior on a chrono.
- Balance hammer to reach a stable velocity node; avoid overdriving.
- Confirm consistency over a longer string (not just a handful of shots).
- Refine barrel harmonics with tensioner and/or integrated tuner.
- Change one thing at a time and record results.
Where to find compatible FX Impact M4 accessories and upgrades
If you’re planning your next steps, it helps to browse by platform rather than searching part-by-part. These collections are useful starting points for fx impact m4 upgrades and accuracy-focused accessories:
And if you’re researching the platform itself, here is a reference listing for the FX Impact M4 .22 Cal Sniper. Even if your caliber differs, the tuning principles in this guide apply across most Impact M4 configurations.
Key takeaways for maximizing Impact M4 accuracy
- Start with consistency: stable regulator behavior and balanced hammer energy usually produce the biggest accuracy gains early on.
- Don’t chase peak velocity: accuracy often lives in a forgiving velocity node, not at the top end.
- Use the barrel system as a precision tool: liner choice, a barrel tensioner, and a tuner can dramatically reduce stringing and flyers once the tune is stable.
- Upgrade with a purpose: parts like a tungsten hammer weight, an upgraded fx impact regulator, or a slug-oriented power kit can improve results when they solve a specific stability problem.
- Document everything: the Impact rewards disciplined testing more than almost any other PCP platform.
With a structured approach, the Impact M4’s adjustability becomes an advantage instead of a rabbit hole. Build a stable baseline, tune for a repeatable velocity node, and then refine the barrel system until your groups confirm you’ve found a setup your rifle and ammo genuinely like.


