PCP Starter Setup: What to Buy After You Choose a PCP Rifle
You’ve picked your PCP rifle—now comes the part that determines how enjoyable (or frustrating) your first months will be: putting together a PCP starter setup that actually matches the rifle you bought and the way you plan to shoot. PCPs are simple to use once you’re set up properly, but they’re less forgiving than springers when it comes to air supply, fittings, and a few must-have accessories.
Below is a practical, experience-based PCP rifle accessories list that covers what most beginners need, what’s optional, and how to choose between the common ways of filling PCP air rifles. If you want to browse as you build your kit, start withPCP Accessories and fill in the rest as your shooting goals get clearer.
Start here: confirm your rifle’s “air side” specs
Before buying anything, check these items in your rifle manual (or product listing):
- Max fill pressure (commonly 200 bar / 2900 psi, 232 bar, 250 bar, or 300 bar / 4350 psi)
- Fill connector type (Foster quick-disconnect is common; some use a specific probe)
- Air cylinder capacity (bigger cylinders take longer to fill with a hand pump and benefit more from a tank)
- Does it have a regulator? (regulated guns are more consistent; unregulated can be more sensitive to fill pressure and pellet choice)
These details determine which filling method makes sense and which fittings you’ll need. Many returns and “it doesn’t fit” problems come down to not matching the rifle’s fill system or pressure rating.
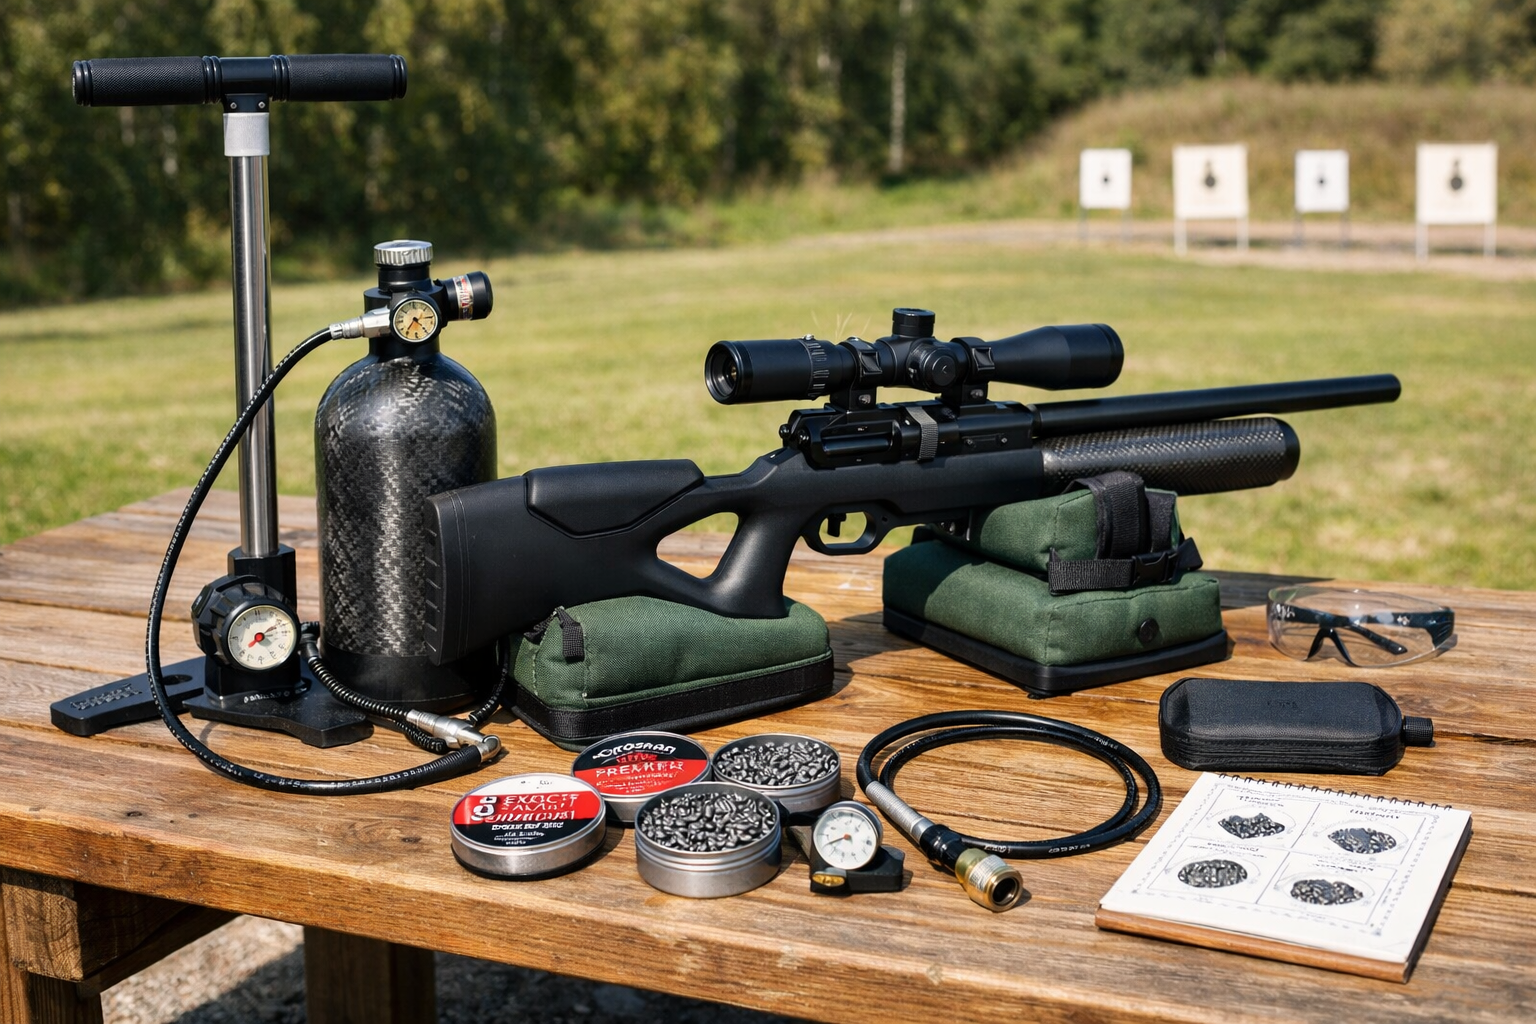
Essential PCP accessories (the true basics)
If you’re creating a beginner PCP gear kit from scratch, these are the accessories most shooters end up needing right away.
1) A reliable way to fill the rifle
For most people, the single most important decision in a PCP starter setup is how you’ll get air into the gun. Your three common options are: hand pump, compressor, or a high-pressure air tank (usually filled by a dive shop, paintball shop, or a specialty air service).
- Hand pump: Lowest cost to start, no power required, slower and physically demanding—especially above ~200 bar or with larger cylinders.
- Compressor: Fast and convenient at home. Higher upfront cost, needs basic care (filters, dry air management) and a safe workspace.
- Air tank: Very fast and easy at the range. Requires access to refills and the right tank pressure (especially for 300 bar guns).
We’ll compare them in detail below, because “PCP hand pump vs compressor” (and tanks) is where most beginners either save money wisely or spend twice.
2) Correct fill fittings and a safe hose setup
PCPs are high-pressure systems—don’t improvise fittings. Make sure your fill setup includes:
- Correct connector for your rifle (Foster female quick-disconnect or the correct probe)
- Rated hose for your pressure (especially important for 300 bar / 4500 psi systems)
- O-rings (small spares are cheap and prevent most “mystery leaks”)
If you’re using a tank, you’ll also need a fill station or valve/regulator assembly compatible with your tank and connector type.
3) Pellets (and ideally two or three test tins)
Your rifle might shoot acceptably with almost anything—but it will usually shoot great with the right pellet. Start with two to three different quality pellets in the correct caliber and weight range and test for grouping at your typical distance.
You can shop by caliber and type here:Pellets.
- Lighter pellets often give flatter trajectory at shorter ranges but can be more sensitive to wind.
- Heavier pellets usually buck wind better and can group tighter in many barrels, but drop more and may reduce shot count.
4) Optics (or at least a plan for optics)
Many PCP rifles outshoot what basic open sights can take advantage of—especially beyond 25–30 yards. A scope isn’t mandatory, but it’s common for a reason: it helps you see the rifle’s true accuracy and makes pellet testing easier.
Browse options atScope & Optics.
- Airgun-rated scope: If you ever plan to use it on a springer too, ensure it’s rated for spring recoil. For PCP-only use, many quality optics work well.
- Mounts/rings: Match your rifle’s rail (11mm dovetail vs Picatinny/Weaver) and choose appropriate height for your objective lens and cheek weld.
5) Simple maintenance essentials
PCPs don’t require heavy maintenance, but a few items prevent downtime:
- Silicone oil/grease (appropriate for airgun seals; avoid petroleum oils in high-pressure air systems)
- Spare O-rings for the fill probe and common connection points
- Cleaning method appropriate for airgun barrels (many shooters use pull-through systems; avoid damaging the crown)
Filling PCP air rifles: hand pump vs compressor vs tank
Choosing your air source is both a budget decision and a lifestyle decision. Here’s how to choose based on how often you shoot, your rifle’s pressure, and your tolerance for setup time.
Option A: PCP hand pump (best lowest-cost entry)
A hand pump is the simplest way to start filling PCP air rifles at home. You buy the pump, confirm the fitting, and you’re independent—no electricity and no trips for refills.
Shop pumps here:Hand Pumps.
- Pros: Lowest upfront cost, portable, no external refills, great for occasional shooting and smaller air cylinders.
- Cons: Time and effort add up; topping off from 150 to 200 bar is manageable, but repeated fills to higher pressures can get old fast. Moisture management depends on the pump quality and technique.
- Best for: New owners shooting occasionally, rifles with moderate fill pressures, and anyone wanting the cheapest functional PCP starter setup.
Practical tip: Many beginners enjoy a hand pump at first, then upgrade later. If you start with a pump, prioritize a model with a good moisture filter and smooth operation.
Option B: Compressor (best convenience at home)
A compressor is the fastest route to “grab the rifle and shoot” convenience. For frequent shooters, it can be the difference between loving your PCP and letting it sit because filling is a chore.
- Pros: Quick fills, easy top-offs, supports multiple PCPs, no searching for a refill station.
- Cons: Higher upfront cost, requires attention to filtration/dry air, and you’ll want a safe routine (stable surface, correct connections, never leaving it unattended).
- Best for: Regular backyard shooting, higher-volume plinking, families with multiple PCPs, or anyone who wants maximum convenience.
Moisture matters: Clean, dry air protects your rifle’s seals and regulator. A good compressor setup includes effective filtering and a habit of not rushing connections or disconnections.
Option C: High-pressure air tank (best for range days and speed)
A tank setup fills quickly and feels effortless. You’ll need the correct tank pressure, a fill station/valve setup, and a convenient place to get the tank refilled.
Browse tank options here:Air Tanks.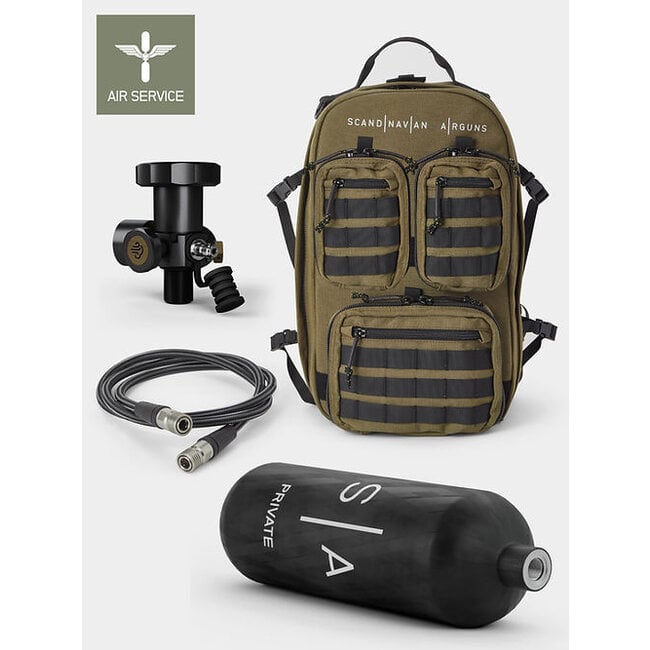
- Pros: Very fast fills, excellent for range sessions, minimal noise at home, no power required while filling.
- Cons: Requires access to refills; performance depends on tank pressure versus rifle pressure (a 300 bar rifle benefits from a 300 bar/4500 psi tank). Tank inspections and safe handling are non-negotiable.
- Best for: Shooters who have easy access to refills, club members, or anyone who wants the simplest “plug in and fill” experience without a home compressor.
Which filling method should you choose?
- If you shoot once in a while: Start with a hand pump.
- If you shoot weekly (or more): A compressor is often the most satisfying long-term choice.
- If you do long range days or share air with friends: A tank setup is extremely convenient, especially as a secondary air source.
- If your rifle is 300 bar: Plan your air source carefully. A hand pump can work, but it’s a commitment; many owners prefer a compressor or 4500 psi tank for sanity.
Nice-to-have gear that quickly becomes “why didn’t I buy this sooner?”
Once the rifle is shooting, these add-ons improve consistency, comfort, and troubleshooting.
Chronograph (for tuning and peace of mind)
A chronograph tells you velocity consistency, helps you verify you’re in your intended power range, and makes pellet testing more meaningful. It’s especially useful for regulated rifles (confirming the regulator is behaving) and for diagnosing leaks or valve issues.
Moderator/suppressor considerations (where legal)
In Canada, suppressors for firearms are prohibited devices, and that includes many items marketed elsewhere as “airgun suppressors.” Some PCPs use factory shrouds or integrated moderation. Make sure any sound-reduction accessory is legal and clearly intended for airguns within Canadian regulations. When in doubt, ask before buying.
Bipod, bags, or a simple rest
If your goal is accuracy, stability matters. A basic front rest or shooting bag often improves groups more than a new pellet brand. For hunting-style setups, a bipod can help, but bags are often steadier on a bench.
Spare magazines (if your rifle uses them)
Extra magazines are a quality-of-life upgrade: less fumbling, faster range sessions, and easier pellet testing (one pellet per magazine during comparison).
Pellet seating tool (only if needed)
Some barrels prefer pellets seated consistently to a certain depth. This is not mandatory for most beginner setups, but it can help if your rifle is pellet-fussy.
A practical PCP starter setup checklist (buy in this order)
If you want a clean shopping plan, here’s a sensible order that prevents duplicate purchases:
- Filling solution (hand pump, compressor, or tank) matched to your rifle’s max fill pressure
- Correct fill fittings (Foster or probe) plus spare O-rings
- Two to three pellet tins for accuracy testing
- Optic + rings/mount appropriate for your rail and shooting distance
- Basic maintenance items (silicone-safe seal care and a gentle barrel-cleaning approach)
- Optional upgrades (chrono, rests/bags, spare mags)
Common beginner mistakes (and how to avoid them)
Buying the wrong pressure-rated gear
Don’t assume “all PCP stuff fits all PCPs.” Match your rifle’s max fill pressure and connector type. Especially with 300 bar rifles, ensure every component in the chain is rated appropriately.
Overfilling or rushing the fill process
Overfilling can cause inconsistent performance and unnecessary wear. Fill slowly, watch the gauge, and stop at the recommended pressure. With probes and quick-disconnects, slow and steady prevents O-ring damage.
Starting with only one pellet
Pellets are the “ammo and tuning” combined in one. Most accuracy complaints disappear after testing two or three quality options. Make pellet testing part of your beginner PCP gear plan from day one.
Ignoring moisture management
Moisture is the enemy of long-term reliability. Whether you’re pumping, compressing, or using a tank, use proper filtration, keep dust caps on fittings, and store gear clean and dry.
Where to shop the core categories
- PCP Rifles
- PCP Accessories
- Air Tanks
- Hand Pumps
- Pellets
- Scope & Optics
Bottom line: build the setup around how you’ll actually shoot
The best PCP starter setup isn’t the most expensive one—it’s the one that makes your rifle easy to fill, consistent to shoot, and simple to maintain. If you’ll shoot occasionally, a hand pump-based PCP rifle accessories list can be short and affordable. If you’ll shoot often, leaning into a compressor or tank system early usually saves money and frustration.
Once your air supply, fittings, pellets, and optics are sorted, PCP ownership becomes what it’s supposed to be: smooth, accurate shooting with very little day-to-day fuss.


